This article contains information on how to align a rebate/rabbet cutter, sometimes referred to as a reference engraver on industrial wood moulding machinery. We have worked in and around many Weinig moulder’s throughout our career, so we will use their low speed, single knife finish moulder as an example. Not every moulder will have a rebate/ rabbet cutter installed on them, as time goes on you will see less use of rebate/rabbet cutters on moulding machinery.

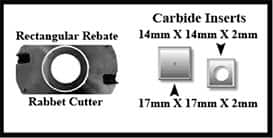
Rectangular Rebate/Rabbet Cutter Head
In the woodworking industry, a rebate or rabbet is a recess or groove cut into the edge of a piece of wood or lumber, not to be confused with a dado, which is a groove machined into a piece of lumber, but both edges of the groove have wood each side of the plow or cut.

Dado and Rabbet
A rebate cutter installed on moulder accomplishes a few task, helps straighten or joint the lumber, but more importantly it reduces the distance off unsupported lumber at the right spindle.
Rebate cutters are located on the first bottom spindle, together with the first moulding knife cutter head. Proper alignment is essential for smooth running of wood products while manufacturing millwork thru your moulder woodworking machinery.

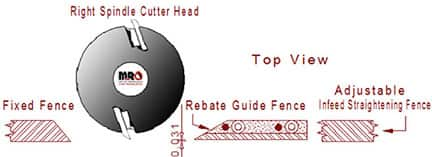
Moulder Rebate Guide Fence and Right Spindle
To start, the rebate guide fence is purposely located behind the fixed fence located after the right spindle, by approximately 1/32”, it is a fixed position from the manufacturer, pinned and bolted in place. The reason it is in a fixed position is, if you located the in-feed straightening fence in the “0” position that would imply you did not want to make a cut or remove any lumber off the right spindle, in theory, these are in line at “0” position. In milling operations of S2S (surface 2 sides) or only surfacing just the top and bottom sides of the lumber, the rebate/rabbet cutter would not be in play even though the first bottom cutter head is in a cutting procedure, therefore the rebate cutter would not leave any marks on the lumber during milling.

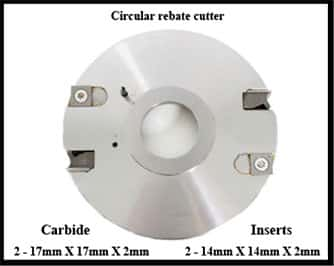
Circular Rebate/Rabbet Cutter Head
Alignment of a rebate cutter is critical; an improperly aligned rebate/rabbet cutter can be one of many sources of tear out in milled lumber, it can also cause your lumber to drift thru the machine unsupported.
Please follow all lockout and tag out procedures your company might have in place before adjusting any moulding machinery.
There are two movements for each cutter head, axial and radial, let us accomplish the axial movement first and then we will explain the radial adjustment.
- Make use of your 10”-12” straight edge supplied with moulder upon purchase, place it on the moulder bed plate lengthwise along the rebate cutter guide fence, slowly rotate your first bottom cutter head counterclockwise by hand, the vertical 14mm x 14mm x 2mm carbide cutter on your rebate cutter should lightly touch the edge of the straight edge. If it does not touch or if it touches too heavy, adjust your axial movement accordingly on first bottom spindle until it lightly touches the vertical 14mm x 14mm x 2mm carbide insert, this is the proper setting.
- Now the radial movement, place the identical straight edge on the top of the fixed rebate cutter fence, rotate the first bottom cutter head counterclockwise until it touches the straight edge, our objective is that the 17mm x 17mm x 2mm carbide inserts touch, it does not matter if insert cutters are touching heavy, that’s actually better. It is important that the horizontal cutters take enough wood off the lumber to clear the top of the rebate cutter guide, otherwise it will push the lumber away from the rebate fence as well as the fixed fence and trigger tear out from the right spindle cutter head.
If the insert cutters are unable to encounter your straight edge located on the top of the rebate guide fence, we have an issue that will require some alternatives. Luckily, we have a couple of options to choose from below.
First option, if your using moulding knife steel in your first bottom cutter head, remove the cutterhead from the moulder, reduce your cutting circle by lowering the moulding knives in the cutter head pockets then repeat the alignment procedure for the first bottom cutter head to the bedplate. Refer to our article on cut steel sizes ; you ought to be utilizing 1-1/2” width of knife steel, no larger.
The second option is if your using spiral insert cutter head is to reduce the diameter of the cutter head itself, there are different diameters to choose from that will work properly with the rebate cutter.
One last note which is extremely important, using a feeler gauge, make sure the moulding knives cutter head do not contact the 14mm x14mm x 2mm carbide inserts. If they encounter each other, use shims between the cutter heads, this will prevent carbide cutters from breaking after tightening of cutter head onto the shaft, and eliminate the possibility of spinning a cutter head onto the shaft, experience has its cost.
We are confident we have provided you with pertinent information that will give assistance in aligning the moulder rebate/rabbet cutter; if we can be of further support please contact us.


