To stay on the same level, we will first discuss some of the basic background terminology. Snipe, in reference to the wood moulding industry, is classified as a defect present at the beginning or end of a moulded piece of lumber. In addition, the end on which snipe occurs will be inconsistent with the rest of the moulded piece. If snipe appears, the piece cannot be used in manufacturing or installation without risking your product inferior. In the end, you will throw away valuable profits from your lumber. To illustrate, say I purchase a sixteen-foot piece of wood moulding from a moulding manufacturer costing $2.80 per lineal foot, I expect sixteen feet of usable moulding, not fifteen feet eight inches with four inches of snipe at the beginning or end of the board. For example, take a five thousand lineal foot moulding production run of sixteen footers (three hundred and twelve moulded boards). Add into the equation snipe; say four inches each, totaling twelve hundred fifty inches, or one hundred and four feet of moulding that because of snipe, will fail quality standards. At market price of $2.80 a lineal foot your overall losses are $291.20; which is quite a bit of your profit margin just to cover the lineal footage you lost to snipe, not to mention it could have been prevented.
In most cases, snipe is present as a result of using uneven or unparalleled pressure shoes to the bedplates below them. These situations often occur from the following circumstances, resulting in snipe: setting the moulding knives uneven to the bedplates (too high or too low), uneven or worn bedplates, and chip breaker pads worn causing improper and uneven contact with the lumber.
The following steps below will teach you how to parallel your moulder’s flat pressure element (shoe) to the bedplates which the moulding runs under. Each moulder machine operator working in the field is responsible to know the process of paralleling their pressure shoe elements.
Here are a couple of things you need before we begin…- Two 60mm spacers (2.362”), or the tallest spindle spacers you have available.
- A .020” thick ruler that was supplied with your moulder; a feeler gauge the same thickness as the shim underneath the last bottom spindle bedplates (generally about .020” in thickness) will also suffice.
First, position the moulder’s feed beam and top spindle head, the heads located around 2-1/2” in height. Remember to follow all safety rules, including any lock out tag out procedures your company has in place.
Next, choose to either remove the .020” shim from under your last bottom bedplate, or simply leave the shim installed and calibrate the pressure shoe evenly. If the second option of leaving the shim in place is more efficient you will need the .020” ruler or feeler gauge to compensate for the shim during calibration. I recommend removing the shim; it allows you to clean the area and assures even calibration with no debris under your bedplates, however, either method will work sufficiently.
Place one of the two 60mm spacers on the bedplate under the top spindle, and the other spacer on top of the last bedplate after the bottom spindle. Note: If you left the shim under the last bottom bedplate, place the .020” ruler under the 60mm spacer that is below the top spindle to compensate for the shim under the last bottom bedplate. If you removed your shim under the last bottom bedplate, there is no need for the .020” ruler. These precautions allow all the bedplates to be level with each other.
If you have a Weinig moulder, the backside of the pressure shoe’s mounting bracket is behind the fixed fence. There are usually four 19mm bolts securing these pressure shoes to the casting of the machine. Loosen all four bolts, only just enough for the shoe to be able to move, but still keeping the shoe pinned to the casting; this should keep the pressure shoe in place along with the bolts.
Now turn the star knob, raising and lowering the pressure shoe, down until it just touches the top of the two spacers on the bedplates. Now the pressure shoe should have just self-leveled itself front to back lengthwise, you can now retighten the four bolts, which you loosened earlier.
Lastly, check to see if the outside to inside on the pressure shoe is parallel. This can be tricky depending on age and or wear on the bedplates, including the actual pressure shoe itself. Take the same 60mm spacers, put one on the front edge and the other one on the back edge of the pressure shoe; slide both the spacers from the inside fence to the outside guides with the pressure shoe barely giving some resistance, it should all be even pressure. If not you will have to use shims to offset the pressure shoe until it is parallel to the bedplates front to rear, because, to the best of my knowledge, there is no adjustment for this on most moulders. The easiest place to shim the pressure shoe is between the top of the pressure shoe and the bottom of the “L” shaped mounting bracket (not the one we adjusted in the previous paragraph). Using shims here should only be used as a quick fix to your sniping issues. Replacing worn pressure shoes or bedplates are correct ways to remedy an unparalleled moulder.
Now that you are finished you should be parallel front to back, inside to outside. As a quick reminder, if you took out the shim under the last bottom to calibrate replace it after you are done. Also, remove all spacers and rulers from the machine, leaving you a pressure shoe parallel to the bedplates and exterminating your snipping problems. This procedure, when performed regularly should eliminate sniping caused by the pressure shoe imbalance.
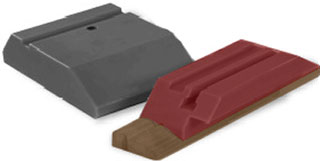
Pressure shoes come in all shapes and sizes depending on the mouldings you are manufacturing. They can be a mirror reflection of the product, beveled, or simply flat. If you find yourself in need of any custom pressure shoes or chip breakers, I recommend Advanced moulding technologies in Castor, Louisiana; the Guin family has been making high quality pressure shoes for many years with ample success. Be aware that you can always download any of Mirror Reflections moulding knife, drawing exchange format, (DXF) profiles directly from the moulding knife catalog and eliminate any chance of errors between moulding knife and custom pressure shoe manufacturing.
I hope to have provided some useful information for you, if I can be of further assistance please feel free to contact us.
Have a great day!


